Create Your Own Floor Plan
Designing a home can be an exciting but daunting task, particularly when it comes to creating a floor plan that meets your needs and preferences. However, with careful planning and a few helpful tools, you can easily create a professional-looking floor plan on your own.
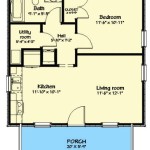
Step 1: Define Your Needs and Space Requirements
Before you start drawing, take some time to consider your current and future needs. Determine the number of bedrooms, bathrooms, and other rooms you require. Consider the size and layout of each room, taking into account furniture placement, storage, and natural light. Create a list of all the features you want in your home, such as a kitchen island, fireplace, or home office.
Step 2: Gather Inspiration and Research
Look at home design magazines, websites, and Pinterest for inspiration. Save images of floor plans, room layouts, and architectural styles that resonate with you. Research various architectural styles to understand the different principles and elements that can influence your design.
Step 3: Choose a Floor Plan Software
There are multiple software options available for creating floor plans, both free and paid. Choose a software that is user-friendly, offers a wide range of features, and allows you to customize your designs. Some popular options include SketchUp, AutoCAD, and Chief Architect.
Step 4: Start Sketching
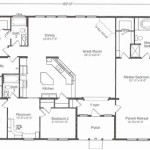
Roughly sketch out your floor plan on paper or using the software of your choice. Start with the overall shape and layout, then gradually add rooms and walls. Use a scale to ensure your drawing is accurate.
Step 5: Add Walls and Doors
Once you have the basic layout, start adding walls and doors. Use the wall thickness tool in your software to define the thickness of your walls. Pay attention to the placement of doors, ensuring they open into or out of rooms without obstructing furniture or traffic flow.
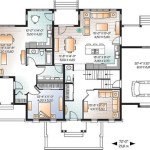
Step 6: Furnish and Decorate
To get an idea of how your floor plan will look when furnished, add furniture and décor using the software tools. This will help you identify any potential space issues or awkward layouts.
Step 7: Refine and Finalize
Go over your floor plan carefully and make any necessary adjustments. Consider the flow of traffic, the placement of utilities, and the overall functionality of the space. Once you are satisfied with your design, save it as a file and print it out for reference.
Tips for Creating a Successful Floor Plan
- Consider the natural flow of movement throughout the home.
- Avoid creating rooms that are too small or narrow.
- Maximize natural light by placing windows strategically.
- Use different wall thicknesses to create depth and interest.
- Pay attention to the placement of furniture and appliances.
Conclusion
Creating your own floor plan is a rewarding experience that allows you to design a home that truly meets your needs and aspirations. With careful planning, inspiration, and the right tools, you can easily transform your vision into a detailed and functional floor plan.

Make Your Own Floor Plans

Make Your Own Blueprint How To Draw Floor Plans

Design Your Own Home House Designing Homes

Floor Plan Creator And Designer Free Easy App

House Plans How To Design Your Home Plan

Floor Plan Creator And Designer Free Easy App

Make Your Own Blueprint How To Draw Floor Plans Drawing House Sketch Plan

House Plans How To Design Your Home Plan

Floor Plans Solution Conceptdraw Com

Creating Your Dream Custom Floor Plan Citadel Signature Homes