How to Draw House Plans: A Comprehensive Guide
Creating house plans, whether for personal use, renovations, or professional presentations, requires a systematic approach. House plans serve as a visual representation of a building's layout, dimensions, and features, enabling builders, contractors, and homeowners to understand the space before construction begins. This article outlines a step-by-step guide on how to draw house plans, covering essential elements and techniques.
Understanding the Fundamentals
Before commencing the drawing process, it is crucial to grasp the fundamental concepts of architectural drawing. This includes understanding scale, conventions, and the different types of drawings that comprise a complete house plan set. Familiarity with common architectural symbols for doors, windows, plumbing fixtures, and electrical outlets is also necessary.
Scale: Architectural drawings are typically created using a specific scale, representing the relationship between the drawing and the actual building dimensions. Common scales include 1/4" = 1'-0" meaning one-quarter inch on the drawing represents one foot in reality, or 1/8" = 1'-0". Selecting an appropriate scale ensures that the drawing is both accurate and legible. A smaller scale allows for a larger area to be represented on a single sheet, but reduces the level of detail that can be included. A larger scale allows for more detail but limits the overall area that can be drawn.
Conventions: Architectural drawings adhere to specific conventions regarding line weights, symbols, and notation. Certain line weights are used to distinguish between different elements, such as walls, doors, and windows. For instance, thicker lines typically indicate walls, while thinner lines represent windows. Standardization ensures that the drawings are easily interpreted by all parties involved in the construction process.
Types of Drawings: A complete set of house plans generally includes several types of drawings, each serving a specific purpose. These typically include:
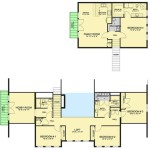
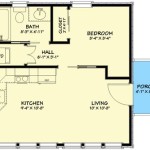
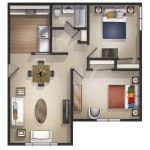
- Floor Plans: Horizontal sections showing the layout of rooms, doors, windows, and other features on each level of the house.
- Elevation Views: Orthographic projections showing the exterior appearance of the house from different sides (front, rear, left, and right).
- Section Views: Vertical sections cutting through the house to reveal interior construction details, such as wall assemblies and floor-to-ceiling heights.
- Site Plans: Drawings showing the location of the house on the property, including property lines, setbacks, driveways, and landscaping.
- Foundation Plans: Plans detailing the foundation system, including footings, walls, and slabs.
- Electrical Plans: Diagrams showing the location of electrical outlets, switches, lighting fixtures, and wiring runs.
- Plumbing Plans: Diagrams showing the location of plumbing fixtures, pipes, and drain lines.
- Roof Plans: Drawings showing the roof shape, slopes, and materials.
Proficiency in recognizing and interpreting these different types of drawings is crucial for creating comprehensive and accurate house plans.
Gathering Information and Planning
Before putting pencil to paper (or stylus to screen), it is essential to gather all necessary information about the house. This includes measurements, existing plans (if available), and any specific requirements or preferences of the homeowner. This groundwork will help prevent errors and ensure that the final plans meet the intended purpose.
Existing Structures: If the project involves renovating or adding onto an existing structure, accurate measurements of the existing building are crucial. Use a measuring tape or laser distance measuring device to record the dimensions of rooms, walls, doors, and windows. Take photographs of the existing building to document details and conditions.
Client Brief: If the house plans are being created for a client, a detailed brief outlining their requirements and preferences is essential. This brief should cover aspects such as:
- The desired number of bedrooms and bathrooms.
- The preferred size and layout of the living areas.
- Specific features, such as a home office, media room, or outdoor living space.
- Style preferences, such as traditional, modern, or contemporary.
- Budgetary constraints.
Thoroughly understanding the client's needs and aspirations will ensure that the house plans accurately reflect their vision.
Planning the Layout: Once you have gathered the necessary information, begin planning the layout of the house. Consider factors such as:
- Orientation to the sun (solar gain and shading).
- Prevailing winds (natural ventilation).
- Views (maximizing desirable views and minimizing undesirable views).
- Accessibility (ensuring that the house is accessible to people with disabilities).
- Zoning regulations (setbacks, height restrictions, and other requirements).
- Budget (ensuring that the plan is feasible within the available budget).
Create a bubble diagram or preliminary sketch to explore different layout options. This will help you identify the most efficient and functional arrangement of spaces.
Drawing the House Plans: A Step-by-Step Guide
The actual drawing process can be accomplished manually using traditional drafting tools or digitally using computer-aided design (CAD) software. Both methods have their advantages and disadvantages. Manual drafting requires skill and precision but offers a tangible connection to the drawing. CAD software allows for greater accuracy, flexibility, and ease of modification.
1. Setting Up the Drawing: Begin by setting up the drawing sheet with the appropriate scale and title block. The title block should include the project name, drawing number, date, and the name of the person who created the drawing.
2. Drawing the Walls: Draw the exterior walls of the house first, using the appropriate line weight. Ensure that the walls are accurately positioned and dimensioned according to the scaled measurements.
3. Adding Interior Walls: Draw the interior walls, using a slightly lighter line weight than the exterior walls. Ensure that the interior walls are aligned and perpendicular to the exterior walls, creating a clear and organized layout.
4. Inserting Doors and Windows: Insert the doors and windows into the walls, using the appropriate architectural symbols. Ensure that the doors swing in the correct direction and that the windows are located to provide adequate light and ventilation.
5. Adding Plumbing Fixtures: Draw the plumbing fixtures, such as toilets, sinks, and showers, in the bathrooms and kitchen. Use the appropriate symbols and ensure that the fixtures are properly spaced and located.
6. Adding Electrical Outlets and Switches: Draw the electrical outlets, switches, and lighting fixtures, using the appropriate symbols. Ensure that the outlets and switches are conveniently located and that there are enough lighting fixtures to provide adequate illumination.
7. Adding Dimensions and Notations: Add dimensions to the walls, doors, windows, and plumbing fixtures. Use clear and concise notations to identify different elements and materials. Ensure that the dimensions and notations are accurately placed and easy to read.
8. Drawing Elevation Views: Create elevation views of the house, showing the exterior appearance from different sides. Indicate the roof pitch, window and door styles, and exterior materials. Ensure that the elevation views are consistent with the floor plans.
9. Drawing Section Views: Create section views to show interior construction details, such as wall assemblies and floor-to-ceiling heights. Indicate the materials and dimensions of the different components. Ensure that the section views are consistent with the floor plans and elevation views.
10. Reviewing and Revising: Once the house plans are complete, review them carefully for errors and omissions. Make any necessary revisions to ensure that the plans are accurate and complete. It's beneficial to have another person review the plans as a fresh pair of eyes can often spot mistakes. Ensure all dimensions add up correctly and that all symbols are used accurately.
Utilizing CAD Software for House Plans
Computer-Aided Design (CAD) software has revolutionized the process of creating house plans. CAD software offers a wide range of tools and features that can significantly improve accuracy, efficiency, and flexibility. Popular CAD programs for architectural design include AutoCAD, Revit, SketchUp, and ArchiCAD.
Advantages of CAD Software:
- Accuracy: CAD software allows for precise drawing and measuring, minimizing the risk of errors.
- Efficiency: CAD software can automate many tasks, such as drawing repetitive elements and generating schedules.
- Flexibility: CAD software allows for easy modification and revision of drawings.
- Collaboration: CAD software facilitates collaboration between architects, engineers, and contractors.
- 3D Modeling: Many CAD programs offer 3D modeling capabilities, allowing you to visualize the house in three dimensions.
Learning CAD Software: If you are new to CAD software, there are many resources available to help you learn. These include online tutorials, training courses, and books. Start with a basic program and gradually progress to more advanced features as you gain experience. Practice using the software by creating sample house plans. Many CAD programs offer free trial versions, allowing you to test the software's capabilities before committing to a purchase.
Best Practices for CAD Drawings: When using CAD software to create house plans, it is important to follow certain best practices to ensure that the drawings are accurate, organized, and easy to use. These practices include:
- Using Layers: Organize the drawing elements into layers, which allows you to control the visibility and properties of different elements. For example, you might create separate layers for walls, doors, windows, and furniture.
- Using Blocks: Create blocks for repetitive elements, such as doors, windows, and plumbing fixtures. This makes it easier to insert and modify these elements throughout the drawing.
- Using Standard Symbols: Use standard architectural symbols for doors, windows, plumbing fixtures, and electrical outlets. This ensures that the drawings are easily understood by all parties involved in the construction process.
- Using Consistent Line Weights: Use consistent line weights to distinguish between different elements, such as walls, doors, and windows.
- Adding Dimensions and Notations: Add dimensions and notations to the drawing to provide clear and concise information about the size and location of different elements.
By following these best practices, you can create high-quality house plans that are both accurate and easy to use. The effective use of CAD software can significantly enhance the efficiency and accuracy of the house plan creation process.

Floor Plan Creator And Designer Free Easy App

How To Draw A Floor Plan Live Home 3d

How To Draw A Floor Plan The Simple 7 Step Guide For 2024

Draw Floor Plans With The Roomsketcher App

Make Your Own Blueprint How To Draw Floor Plans Drawing House Sketch Plan

Draw Floor Plans Create Professional

Draw Floor Plans With The Roomsketcher App

Draw Floor Plans In Half The Time Cedreo

House Plans How To Design Your Home Plan

Easy Home Building Floor Plan Cad Pro