How To Draw Your Own Home Plans
Creating home plans can seem daunting, especially without prior architectural or design experience. However, with careful planning, the right tools, and a systematic approach, individuals can successfully draft basic home plans suitable for initial visualization, preliminary cost estimations, and communication with building professionals. This article provides a comprehensive guide to drawing your own home plans, covering essential steps, necessary tools, and crucial considerations for achieving accurate and functional designs.
Before commencing any drawing, it's imperative to understand the fundamental principles of architectural drafting. This includes grasping standard symbols, line weights, and scaling techniques. Familiarizing oneself with building codes and regulations relevant to the local jurisdiction is also crucial to ensure the design complies with legal requirements. This preliminary research lays the groundwork for a smooth and compliant design process.
Gathering Information and Defining Needs
The initial stage involves a thorough assessment of the homeowner's needs and desires. This step is critical in shaping the overall design and ensuring it aligns with the intended use of the space. Begin by creating a detailed list of requirements, including the number of bedrooms and bathrooms, desired living areas, and any specific features such as a home office, entertainment room, or dedicated storage space. Consider the lifestyle of the occupants and how they intend to use each area of the home.
Site analysis is equally important. Measure the dimensions of the lot and identify any existing structures, utilities, trees, or other features that may influence the design. Note the orientation of the property, considering sun exposure, prevailing winds, and potential views. Understanding these factors will help optimize energy efficiency and create a comfortable living environment. Obtain a copy of the property survey, if available, to confirm boundaries and easements.
Budget considerations play a significant role in the design process. Establish a realistic budget early on to guide decisions regarding the size, materials, and complexity of the home. Research construction costs in the local area and consult with contractors to get a general idea of potential expenses. It is always prudent to factor in a contingency fund for unexpected costs or changes during construction.
Collect inspirational material from various sources, such as magazines, books, and online platforms. Create a mood board or scrapbook to visualize the desired aesthetic, architectural style, and interior design elements. This collection of inspiration will serve as a valuable reference point throughout the design process and help communicate the homeowner's vision to builders and other professionals.
Selecting Tools and Materials
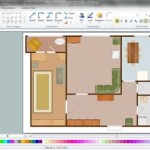
The tools and materials required for drawing home plans depend on the chosen method – manual drafting or computer-aided design (CAD). While CAD software offers numerous advantages in terms of precision and efficiency, manual drafting is still a viable option for simple designs or for those who prefer a hands-on approach. Each method requires specific tools and materials.
For manual drafting, essential tools include: drafting pencils (H, 2H, and 4H for varying line weights), erasers (both standard and kneaded), a drafting table or board, a T-square, triangles (30-60-90 and 45-45-90), a scale ruler (architect's or engineer's scale), compass, protractor, and drafting tape. High-quality drafting paper is also essential for producing clean and accurate drawings. Invest in a good set of drafting tools to ensure precision and durability.
If opting for CAD software, several options are available, ranging from free or low-cost programs to professional-grade software used by architects and designers. Popular choices include SketchUp, AutoCAD, Revit, and Chief Architect. Each software program offers a different set of features and capabilities, so it's important to choose one that aligns with the individual's skill level and design needs. Ensure the computer meets the minimum system requirements for the chosen software.
Regardless of the chosen method, consider using templates and stencils to streamline the drawing process. These tools can save time and ensure accuracy when drawing common architectural elements such as doors, windows, stairs, and fixtures. Templates are available for both manual drafting and CAD software, providing a consistent and professional look to the plans.
Developing the Floor Plan
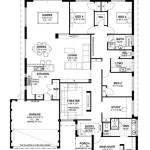
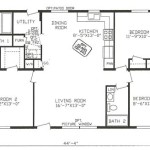
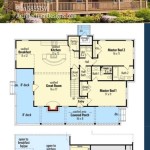
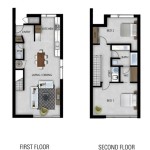
The floor plan is the foundation of any home design, providing a two-dimensional representation of the layout and dimensions of the rooms. Start by sketching out a rough floor plan, experimenting with different layouts and configurations. Consider the flow of traffic between rooms and ensure that the floor plan is functional and efficient.
Begin by drawing the exterior walls of the house, using the dimensions gathered during the site analysis. Establish a consistent scale for the drawings, such as 1/4 inch = 1 foot or 1/8 inch = 1 foot. Use precise measurements and ensure that all walls are drawn accurately. Indicate the thickness of the walls, typically 4-6 inches for interior walls and 6-8 inches for exterior walls.
Next, draw the interior walls, dividing the space into individual rooms. Consider the size and shape of each room, ensuring that it is adequate for its intended purpose. Pay attention to circulation patterns, minimizing hallways and creating a sense of openness. Locate doors and windows strategically, considering natural light, ventilation, and views.
Add architectural features such as stairs, fireplaces, and built-in cabinets. Use standard architectural symbols to represent these features accurately. Indicate the dimensions of each room and the overall dimensions of the house. Include notes and annotations to clarify specific design elements or construction details. Label each room clearly and consistently.
Once the basic floor plan is complete, review it carefully, checking for errors and inconsistencies. Make any necessary revisions to improve the functionality and aesthetics of the design. Consider seeking feedback from friends, family, or building professionals to gain additional perspectives and identify potential issues.
Creating Elevations and Sections
Elevations are two-dimensional drawings that show the exterior views of the house from each side. They provide a visual representation of the architectural style, materials, and details of the exterior. Sections are vertical cutaways that reveal the interior construction of the house, showing the relationship between different floors and the foundation.
For the elevations, start by drawing the outline of the house, based on the floor plan. Indicate the height of the walls, roof, and other architectural elements. Add details such as windows, doors, siding, roofing materials, and trim. Use different line weights to create depth and visual interest. Specify the materials and colors of each element, using descriptive notes or a legend.
Consider the surrounding landscape when drawing the elevations. Show the grade of the land, any existing trees or shrubs, and any other features that may affect the appearance of the house. Pay attention to the proportions and symmetry of the design, ensuring that it is visually appealing from all angles. Indicate the compass directions for each elevation (north, south, east, and west).
To create sections, imagine cutting through the house vertically at a specific point. Draw the outline of the cut, showing the walls, floors, roof, and foundation. Indicate the materials and construction details of each element. Show the height of the ceilings, the thickness of the floors, and the depth of the foundation. Label each element clearly and consistently.
Sections are particularly useful for visualizing complex construction details and understanding how different parts of the house fit together. They can also be used to demonstrate compliance with building codes and regulations. Draw sections at key locations throughout the house, such as at stairs, fireplaces, and areas where there are significant changes in elevation.
Adding Details and Specifications
Once the basic plans are complete, it is time to add details and specifications that provide additional information about the design and construction of the house. These details are essential for accurate cost estimation, construction bidding, and building permit approval.
Create a schedule of doors and windows, listing the type, size, material, and location of each opening. Include details such as the manufacturer, model number, and energy performance ratings. Specify the hardware and finishes for each door and window. This information will help builders and suppliers order the correct materials and ensure that the openings meet the required standards.
Develop a schedule of finishes, listing the type, color, and manufacturer of all interior and exterior finishes, such as flooring, wall coverings, paint, trim, and roofing materials. Specify the installation methods and any special requirements. Provide samples or swatches of the finishes to ensure that they meet the homeowner's expectations. This information will help contractors and subcontractors select the appropriate materials and install them correctly.
Include details about the electrical, plumbing, and mechanical systems of the house. Show the location of outlets, switches, light fixtures, and appliances. Indicate the size and type of wiring, piping, and ductwork. Specify the heating, cooling, and ventilation systems. Consult with licensed professionals to ensure that these systems are designed safely and efficiently.
Add notes and annotations throughout the plans to clarify specific design elements or construction details. Use clear and concise language, avoiding jargon or technical terms that may be unfamiliar to builders or homeowners. Provide measurements and dimensions for all key features. Consider creating a legend to define the symbols and abbreviations used in the plans.

House Plans How To Design Your Home Plan

House Plans How To Design Your Home Plan

Make Your Own Blueprint How To Draw Floor Plans

Make Your Own Blueprint How To Draw Floor Plans

How To Draw A Floor Plan Live Home 3d

Create Floor Plan

House Plans How To Design Your Home Plan

Be Your Own Floorplanner How To Draw House Plans Drawing Design Plan

Floor Plan Creator And Designer Free Easy App

Floor Plans Learn How To Design And Plan