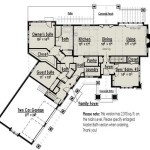
How To Make Your Own Floor Plans
Creating a floor plan is a crucial step in any building or renovation project. A well-designed floor plan provides a visual representation of the intended layout, enabling effective space planning, furniture arrangement, and communication with contractors. While professional architectural services are recommended for complex projects, generating basic floor plans for simpler endeavors is achievable with readily available tools and a systematic approach.
1. Measure the Space Accurately
Accurate measurements form the foundation of a reliable floor plan. Begin by measuring the exterior walls of the space, noting down each dimension. Then, measure interior walls, doorways, windows, and any fixed elements like fireplaces or built-in cabinetry. Record these measurements clearly in a notebook or digital document, and consider sketching a rough outline of the space to associate measurements with specific locations. Using a laser measure can significantly improve both the speed and accuracy of this process.
For more intricate layouts, consider breaking the space down into smaller, manageable sections. Measure each section individually, ensuring to account for overlaps and intersections. Precision in measurement minimizes potential issues during construction or furniture placement later on.
2. Choose the Right Floor Plan Software
Once measurements are collected, selecting appropriate floor plan software is the next step. Various options cater to different skill levels and project complexities. Free online tools often provide basic drawing functionalities, suitable for simple layouts. More advanced software packages offer features like 3D visualization, furniture libraries, and cost estimation capabilities, making them suitable for larger or more demanding projects.
When choosing software, consider factors such as ease of use, available features, cost, and compatibility with your operating system. Some popular choices include SketchUp, Sweet Home 3D, Floorplanner, and RoomSketcher. Many software options offer free trials, allowing users to experiment and determine the best fit before committing to a purchase.
3. Draw the Walls and Add Architectural Features
With the chosen software, begin by drawing the exterior walls based on the recorded measurements. Ensure that the scale within the software is set correctly to represent the actual dimensions accurately. Next, add interior walls, ensuring proper placement and dimensions. The software's grid functionality can be particularly helpful for alignment and precision.
After establishing the walls, incorporate architectural features such as doors, windows, and fixed installations. Utilize the software's tools to accurately represent the size and position of these elements. Most software includes libraries of standard-sized doors and windows, simplifying this process. Indicate the swing direction of doors to ensure proper space planning.
Consider adding wall thickness to your drawing for a more realistic representation. While this might not be crucial for simple layouts, it becomes essential when considering structural integrity and space planning in more complex projects. Refer to building codes or standard practices for typical wall thicknesses.
4. Incorporate Furniture and Fixtures
Once the structural elements are in place, begin adding furniture and fixtures. Most floor plan software offers libraries of common furniture pieces, allowing users to drag and drop them into the layout. Experiment with different arrangements to optimize space utilization and flow. Adjust the size and orientation of furniture as needed.
Consider the scale of the furniture relative to the room size. Inaccurate scaling can lead to impractical layouts. Many software packages provide dimensions for the furniture elements, allowing for precise placement and appropriate representation within the plan.
5. Annotate and Refine the Floor Plan
Adding annotations enhances the clarity and utility of the floor plan. Label rooms, indicate dimensions, and include notes regarding specific materials or finishes. Annotations provide valuable information for contractors, interior designers, and anyone involved in the project.
After completing the initial layout, review the floor plan carefully for any inconsistencies or potential improvements. Consider traffic flow, functionality, and aesthetic appeal. Refine the plan as needed, iterating on the layout until a satisfactory design is achieved.
It's often beneficial to print the floor plan and walk through the space, visualizing the layout and identifying any potential issues. This physical walkthrough can reveal spatial challenges or opportunities for improvement that might be overlooked on a digital screen.

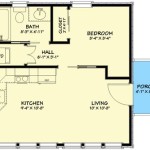
Make Your Own Blueprint How To Draw Floor Plans

Make Your Own Floor Plans

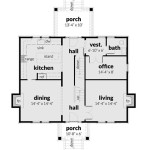
How To Draw A Floor Plan Live Home 3d

House Plans How To Design Your Home Plan

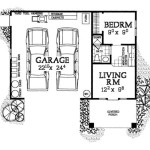
Make Your Own Blueprint How To Draw Floor Plans

Floor Plan Creator And Designer Free Easy App

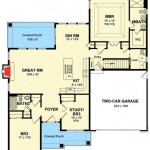
Design Your Own Home House Designing Homes

Be Your Own Floorplanner How To Draw House Plans Drawing Building A

From Sketch To Reality How Design A House You Ll Love

Floor Plans Solution Conceptdraw Com